20220417

And a long pause...

 ... while everyone's health suffers because no one is allowed outside. 

Meanwhile, the ADA is suspended, making those who relied on the bus to get places completely stuck unless they can breathe through a full claustrophobia-inducing mask. Yes, I know s lot of people lie when they make that claim, but not all of us. 

So out of shape now I can't get back up the hill from downtown, & no end in sight. Oh, they CLAIM it'll end 16 March. No, wait, 18 April. No, wait, 3 May. 

Never mind, I'm too sick to go anywhere even if I could get on a bus.


20200712

Breathing in the COVID age, or, Contraption

Going rather off-topic for this post, since there has been some curiosity about my slightly odd alternative to the legally-mandated mask. A short version of the back-story here: I don't breath all that well and have trouble with the "used" air inside a mask or face shield, so I was left with the choice of not going anywhere public, going out but declaring a medical condition and trying to keep six feet from people who were more interested in disapproving of me than in keeping their distance*, or making a spectacle of myself by collapsing in public.

So, I started with a face shield -- an acceptable any generally more comfortable alternative to masks -- that my father had for protection against wood chips and other shop accidents. It's gotta be at least 50 years old and is nice and heavy. I've seen lighter face shields, mere sneeze protection probably designed for food service, but those probably wouldn't work for this.


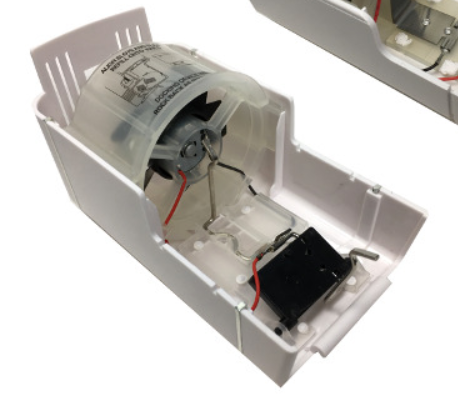
hat gave me as much as an hour, if I didn't do it too often. I needed better ventilation, and decided to try adding a fan somehow. So I hit good ol' American Science and Surplus' website (which any serious tinkerer and cobbler-together of solutions to non-mainstream problems has bookmarked) and found a fancy stick-to-the-wall air-stinker-upper with a nice little fan in a case inside.


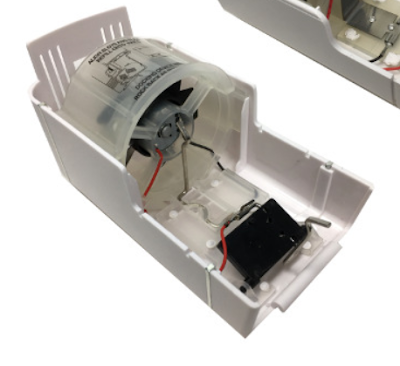
I used a piece of old VCR cable to extend the wires of the fan, then clipped the fan to the lower edge of the shield with a little binder clip. I settled on running it as an exhaust fan, blowing the used air out (approximately onto my collar, which seems in the spirit of the whole mask idea and anyway made more sense than blowing my exhalations back up my nose) so fresh air comes in from the sides. If I tilt the shield slightly back there's even enough room that it doesn't rub on my chin, although that only matters if I'm going to be wearing it for awhile.

I've had some trouble keeping the battery hooked up to the wires on the other end. It's fine as long as I carry it around in one hand with the wires clamped over the battery terminals, but if I want to use both hands or avoid cramped fingers by taping the wires down and putting the battery in a little bag to stick in my waistband (my clothes tending to lack pockets) it tends to come loose, especially if I move around. I considered soldering wires directly to the battery, but somehow that didn't sound safe; consultation with an electrically-savvy friend confirmed my instinct. She suggested I buy a proper battery-holder (which I should have realized existed, but didn't), so will do that as soon as my next credit card billing cycle starts.


One of the wires isn't attached to the fan motor as securely as I'd like, so I may dig out the soldering iron after all and add another drop, but I've managed 7.5 hours straight in the thing. It does rather feel like a costume from a bad '60s sci-fi movie or some kind of dry-land helmet diving set-up, but is still an improvement over rebreathing the same air.


-------------
*To clarify, I have great faith in my own immune system and wouldn't bother with all this for myself, but I recognize that not everyone is as unconcerned and I do try not to upset or threaten others.


--------------------------------------------------------------
Addendum...

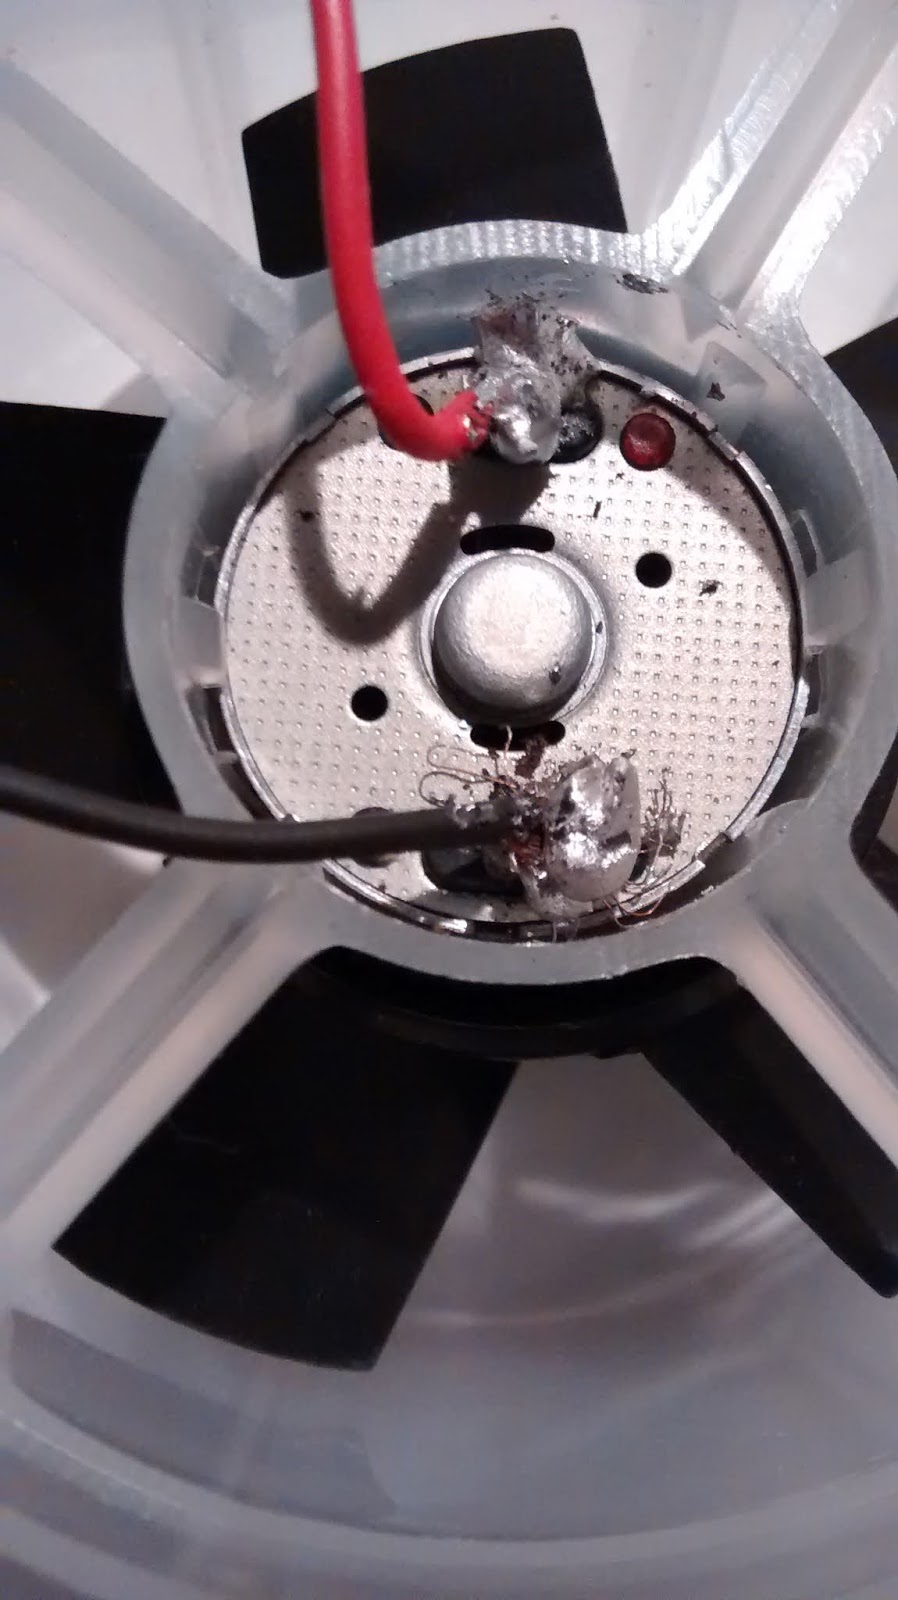
So, I had my hazmat hood all set up and working well -- and was so proud of it -- when I discovered that the fan was only built for sitting in its little case hanging on a wall, diffusing eau de gas station restroom. It ran for several days and then the wires started to come loose from the back of the fan; I got another day out of it and then one side broke off entirely and I had to slink off in disgrace before my volunteer shift was over.


Well, actually, they were very nice and supportive; Thurston County has an excellent food bank run by amazingly nice people (especially for how tired they all are these days). I was the only one feeling the need to slink.

Fortunately, I also inherited my dad's soldering iron and... flux? -- I think the stuff on the spool was called flux, but there's also a tube labelled flux in the box of related bits and pieces. Anyway, got the iron plugged in and heating -- it made a horrible smell, having been packed away for decades, but fortunately I was using the stove as my heat-resistant surface so I just turned on the vent fan over it. Then I realized the tip of the iron was almost falling off and had to go find some pliers to screw it back in with (yay me! for thinking ahead and not trying to do it with my bare fingers first, owowow...).

Now, I will post the result here, but keep in mind I've soldered about twice in my life and that was at least 35 years ago and under parental supervision. So yes, it's an ugly, blobby bodge, but I think it'll hold. I could have discarded the little wires entirely and just stuck on the cable ends, but I worried the resultant blobs would run together, so some credit here. Promise not to judge and you can scroll down to see the photo....


20191225

Bearing cup is finally loose!

After about a month of thumping on that poor hub every time I had a new idea, we finally got it unscrewed and the gears removed. Yay!

I say "we" because it took two of us again. I held the wheel while David wielded the lock ring wrench.


Yep, not the drift punch that all the manuals call for. The drift punch and earlier substitutes weren't transfering enough force to even turn the wheel, and it was almost impossible to get it into the groove without catching the head of the nearest spoke. The wrench allowed us to position the "push points" more precisely and not bounce them around with hammer blows. Actually, the ideal tool would have been a ring with teeth to fit into those grooves and a handle to smack with the hammer, possibly with a cup to screw onto the axle to hold it in place -- like the thing I think of as a "tin can tool" that holds the wrench in place on the bottom bracket, but with a slightly different shape. And maybe another clamp-y tool to keep the wheel from turning. Toolsmithing turned out to be unnecessary (and a good thing, too, since I have neither the tools nor the skill), since I had the use of a large man with strong hands and the right angle for the vise (it's a tad high for me).

And now I get retainer bearings. Except the official parts list says it's a 7 X 1/4" and the one I took out had eight bearings in it. So more research there: did the part change or did someone substitute what s/he had on hand as close enough?

But at least now I can take the hub with me to shop for an index chain without toting the whole wheel all over town.

Oh, and the guy at Deschutes (really should learn their names better, bad me) tells me that what I have is definitely a plain AW hub, not the AW Mark II that I thought it might be. The two little lines stamped on the hub shell are probably an eleven and mean it was made in November of 1964, or, when I was about a year and a half old.

So, here's what I have so far:

20191213

Freeing Oly's buses!

It's official: all Intercity Transit buses will be free next year. The newest ones are already free; they're not bothering to put fare boxes in them at all. S'posed to be a 5-year experiment, so we'll see how it goes.


I gather they'll be taking the fare boxes out of the older buses, too, as they get to them. In fact, (unofficial but from Someone Who Should Know) the tipping point in the whole argument, which has been in the air for awhile now, was that they can't get the current type of fare boxes anymore, or parts to fix them. Faced with spending millions to upgrade all the buses, they decided to dump the fares instead. Seems it was never that valuable a revenue source anyway.

The drivers are a bit concerned about problem passengers being able to just ride the buses all day, but it seems to me it'll also be easier to kick problems off the bus. Maybe that means just passing them around more, but they'd still be a briefer problem per bus, if you will.

Anyway, we'll find out. I of course hope it'll be wildly successful. It's not even really the money -- $2.50 for a day pass, $36 monthly isn't much of a budget-breaker. It's just a hassle to make sure you've got the right change and trying to guess how much you'll ride the bus next month. Free buses will make impulse trips and getting home in bad weather a lot easier.

So I'm encouraging everyone who supports this move to take the bus to downtown Olympia, where parking is such a problem, and go shopping. The buses will see more riders, and if the downtown businesses see an increase in sales, they'll know this is at least a partial solution to the infamous parking problem. I don't know, am I being too optimistic?

In any case it's a good excuse for a shopping spree, even if I'll only be buying postcards (check out Postcrossing for what I'll do with them). I do plan to go to Lily's to some point in the project, although I may not buy anything there. I love their stuff but I have to feel particularly flush to spend that kind of money (they're not that expensive, I just seldom buy new clothes). Maybe I'll go back in the summer when my power bill leaves me a little extra cash.

BTW, the bike racks on the new buses aren't as bad as they look. If you think ahead and open the hoop bit that goes over your front wheel before loading the bike (it goes all the way around and drops open), you don't even need to make the driver un-kneel the bus. It gives the impression that the bike could roll off backwards, but there's a brace behind the front wheel to prevent that. If you're used to the old racks, it takes a second look to notice it.


20191209

The importance of light

Found the %*#! ball cup and the slot to hammer on to unscrew it!

The instruction drawings and photos led me to expect the ring I was looking for to be right against the next layer in (think that's one of the dust caps), and possibly a step lower. Then, the actual ring was under a thick velvety coat of grime and looked like part of the flange; the seam where the pieces join was completely obscured and the slots were nearly invisible.

What the internet said:


What Glenn's Manual said:


What I actually had:


In better light:


Complicating the issue, my "shop" is actually one end of what's supposed to be my apartment's living room. I'll spare you the full rant about living room design; the bottom line is, most of my working light comes from a forehead-mounted flashlight thing. Once I took the wheel into my actual living room (meant to be the bedroom, with a nice ceiling light and south-facing window) to compare with the photo in the *manual, I could barely see the slots. Next step will definitely be to clean the outside of the hub so I can see what I'm doing.

20191112

Turns out I was wrong

I finally took my project bike's rear wheel down to the Walk N Roll shop to discuss replacing the rim and spokes. The rim is steel and fairly rusty, and I thought the spokes were rusty/corroded too, so I figured this would be a good time to learn wheel-building.

Except the Great Olympia Bike Guru (i.e. David at Walk N Roll) tells me it's more complicated than either of us expected. The wheel has 40 spokes, which makes it a difficult rim to match -- most modern, alloy rims have 32 or 36 spokes. And the spokes aren't corroded, they're galvanized; they're supposed to look like that. On top of that, the rim, while made of the less-desirable-with-rim-brakes steel and sporting significant rust patches, is still structurally OK. It's not as simple as buying a new rim; I'll probably be looking for something off an older bike, plus modern spokes aren't quite the same shape. The flanges on steel hubs are thinner than on alloy ones, and modern spoke shoulders curve more gently, so best-case I'd need spoke washers, which are fiddly and expensive.

So, our verdict: rebuild with the current wheel and keep an eye out for both signs of further rusting on the current wheel and a matching rim, ideally a close enough match to use with the current spokes. A shot of something on the Frame Saver lines inside the rim won't hurt in the meantime.

Still waffling on the paint; now I'm thinking the sleek black or grey look won't really fit the "old-school" fluted fenders and generally chunky look. I wonder if I could mimic the colors and general spotty look of corroded copper or patinaed brass. I like that sort of blue-green you get with old copper, and if some of the original flat gold shows through it won't look that odd. So, hmm.

Still gotta figure out how to "unscrew right-hand ball ring completely and remove the cartridge from the hub shell" so I can get in and fix/grease the gears. I've identified the right-hand, i.e. drive side, ball ring but don't see any way to get ahold of it to turn it.*

Did buy it a new tire, though, now that I know for sure what rim I'll be using. Got pair of medium-cheap Schwalbes, in fact, so I could have a matched pair, because good ol' Deschutes had them in stock and because I really really like the expensive but impenetrable high-end Schwalbe Marathons I have on my beloved Breezer.

--------------------
*"Servicing the Sturmey-Archer AW Wide-Ratio Three-Speed Bicycle Hub" appears to want you to use a hammer and punch to do this, but I really don't see how, and anyway I'm not even surethey're not talking about the split-ring p[art before that, which isn't even mentioned here.

20191025

Nearly ready to paint

Now that the weather's turned and there's no real hope of doing any painting outside until spring, I've finally gotten all the bits off the frame and am ready to give it a brisk sanding and start painting. The cleaning/sanding/roughing up of the existing paint is still to be done, so that'll take some of the winter, along with cleaning the rest of the parts.

The main thing, though, is that I got that obnoxious drive-side bearing cup off at last! Took it back to the Walk N Roll shop and borrowed the correct type of wrench, the tool that screws onto the axle to hold the wrench in place (I should know the correct name, but my brain insists on calling it a "little tin can tool" and nothing else will stick), a normal axle since a cottered one won't work, a hammer, and the vise again. Then it was merely a matter of beating on it until it surrendered and came apart. I'd already given it a good soaking in WD-40 and then oil, but it was pretty corroded into place.


Once again, I was glad I stuck it out and got it apart so I could get in there properly with both a wire brush and steel wool for a thorough cleaning. Plus there's some hope it'll be easier to remove the next time I want to get into the bottom bracket to clean and regrease it.

Current leading notion for paint colors: dark grey with lighter blue-grey lugs and just possibly glow-in-the-dark paint for the edges of the lugs and my little moon-and-paw-print logo, depending on price; with that reflective clear-coat I've already decided to finish off with to follow. But black-and-silver is still in the running....