20190923

Into the headset

Finally! got the steering tube out. Apparently the trick is to loosen the stem-expander bolt, unscrew the various rings holding the steering tube in the head tube, and let it hang on the stand for a couple of weeks before smacking it sharply with the handle of a pedal wrench, more in frustration than really trying to knock it loose. Possibly the several whacks with a rubber mallet before letting it hang helped as well, and the occasional tug or twist as I walked past, but it was the pedal wrench that did the trick. Yay!

You may wonder why I bothered, since it functioned just fine, but I'm glad I did. All the bearings were completely dry, with just a rusty-looking patina of what must have been grease once upon a time. It was sort of chalky, with just enough moisture left to stick to the rag and wipe out easily, but I think I caught it before anything got badly worn out. I'll replace the bearings anyway, or at least most of them; some look OK but many are, well, not bright, shiny, and smooth (brinelled?). Plus I think I lost some, unless there are fewer in the bottom bearing cup than in the top. I'm told I can replace the loose bearings with the mind already fixed into a ring, like I'm used to, but I have enough trouble getting headsets to to back together without trying to change things.


And, OK, the main reason I wanted the handlebars/steering tube off was to make the frame easier to paint, 'cause I think I'm going to do that. I don't have anyplace to spray it, though, so I'll probably try brushing the paint in; we'll see how that works out. May end up borrowing someone's garage....

After chatting with David-the-Bike-Guru about paint options, and starting work on a dirty white bike at the Walk N Roll shop, I probably won't go for the white with black or cream with brown color scheme after all. My first impulse was black, which I discarded as not visible enough for what's going to be mostly a winter bike, thinking "if only there were such a thing as reflective black...". Now it seems that might actually be a thing, or black with a reflective clear coat, either of which might look pretty darn, um, pretty. There's also glow-in-the-dark paint, although apparently it doesn't glow for very long; could make for cool accent bits while it lasts, though.

20190911

Not that Huffy :(

I looked more closely at that pretty red '70s Huffy, and it's too tall for me. Guess it wasn't meant to be. Only a little too tall, but it wouldn't be comfortable to ride.

However, I did decide to paint the Hercules; just have to decide between simple white with black trim and cable housings, or cream with brown. Do they make sepia housing? And white/light grey tires, eventually.

20190904

Towing Thing, test #1

Verdict first: the concept seems workable. The execution... needs work.


I put the wheels back on Herc and used that for the test. You may notice in the photos that my test subject lacks a number of parts, including the saddle and brakes. I tucked some pieces of old excercise mat under the naked clamped rim to give it some protection against bumps.

This set-up works fine while walking the lead bike in a straight line. The primary flaw is that I made the end pieces too long, so that if the clamp gets pulled out of position the slightest bit it rubs against the trailer wheels. Some of this problem might be fixed by using a more rigid tie-down technique -- I used bungies because they were quick and would give me an idea. Really I should just saw off the last inch or so at each corner, though.


Also, the clamp wasn't as stable as I'd hoped, mostly because the floor of my trailer isn't actually flat, it's a sheet of plastic that has started to deform wherever the frame doesn't support it. Again, rigid tie-downs; I'm thinking maybe those heavy giant Twist-Ties I saw at Home Depot....

The tow subject (if you will) tended to rock in the clamp -- proper tires would probably have helped -- which allowed the front wheel* to wobble and even flop far enough to drag sideways. I hope solving the above-mentioned issues will fix this enough, but I may have to come up with a way to brace the handlebars/fork to keep the wheel straight.


----------------------------
* actually the last wheel in the line while towing, but you know what I mean.

Bike-by-bike towing

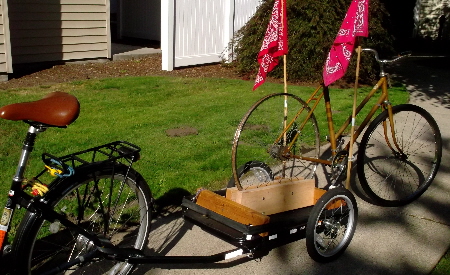
Ever since I got my trailer last spring, I've been thinking about how to load a bike onto it, or anyway to somehow hitch another bike to mine. In the Olympia area, of course, the best way to get a bike of dubious rideworthiness from one place to another is to throw it on a bus, but I wanted to see if I could do it by myself. So this week I finally built myself a Towing Thing out of scrap lumber that will (I hope) clamp onto a wheel and keep a bike upright and steady enough to be towed. I'll post again once I get ahold of a second bike to test it (the only extra bike I have at home is currently in pieces and anyway lacks a rear tire), but for now here's attempt #1:
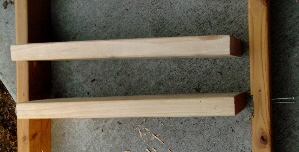
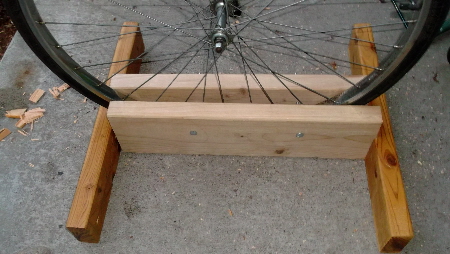
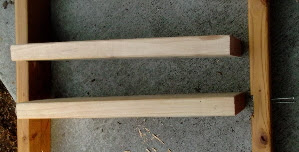
Towing Clamp Thing
Please note that this is my starting version. Assuming I actually get this thing working at some point, I'll post a final, revised version with a link from here. See my progress.

materials:
  • 4 boards such as 2x4s or 2x6s, approx 20-26 inches, in matching pairs*
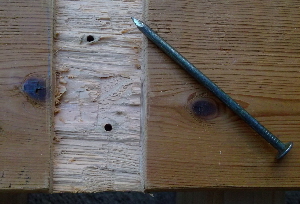
  • 4 nails long enough to go through one piece of wood and far enough into another to hold it securely (I used 3-inch ones but would have been happier with 2 1/2-inch ones)
  • 2 bolts, approx 6 inches long
  • 2 nuts (I prefer wing nuts**) to fit the bolts
  • 4 medium screw eyes

procedure:
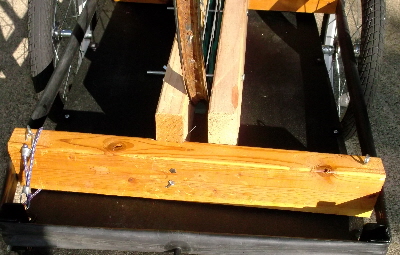
1. Work out which boards will be ends and which sides.

Possibly optional, but recommended for better strength/durability: Mark a line straight across each end piece about an inch from the middle, then use the side pieces to mark a second line further from the center. This is going to be a slot into which the sides will fit. At this point you can do something fancy with a router or band saw or something to make a wide groove, but here's a simple hand-tool technique (and they said I was wasting my time watching The Woodwright's Shop; does anybody know if the first couple of seasons are available on DVD anywhere? I should look for it, it was a good show). Make a shallow cut into one side of each end piece where the two lines are marked. They should be the same depth and maybe 1/4-inch deep or a little less. Then use a chisel to shave off the face of the board between the two cuts (at this point, I went in and rooted out my ear plugs, but suit yourself). Test that the side pieces will slot into the groove thus created.


2. Drill two guide holes in the end pieces where the sides will connect. Drive nails into these holes until they just emerge inside the grooves (if you've made grooves). At this point you can apply some glue if you wish (I didn't, mostly because I didn't have anything weatherproof on hand). Stand the first side piece on end, place the end piece over it with the (slot and) nails ready to go into it and, if using a different width for the side pieces, one side lined up so it will sit flat when turned on its side. Drive the nails through.


Before starting the second side, make sure it's lined up so it will make a box with the other piece when finished, then glue/nail it together as above. Allow glue to dry if appropriate.


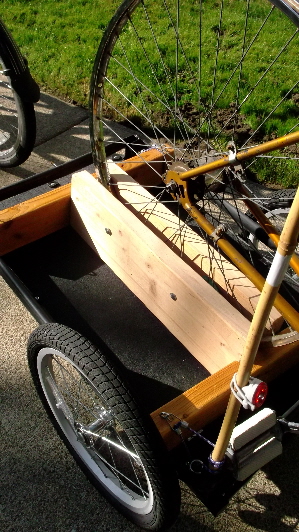
3. Decide if the bolts will be going between the spokes or around the rim and position your holes accordingly. If between the spokes, the holes should be fairly high and about 1/3 of the way in; if outside the rim, you'll want them lower and quite near the end pieces. Since I was using 2x6s for the side pieces, I opted for between the spokes to make sure the wheel doesn't fall out. Drill holes through one side piece, then stack them together (in what will be their closed position) to drill through the second side. If you have a wheel handy, stick it between the two sides to test your clamp, insert the bolts, realize you forgot to get washers, and secure with the nuts (scrounge up or buy a couple of washers before the ride test unless you decide not to use them). The clamp should be fairly stable and hold the wheel easily.


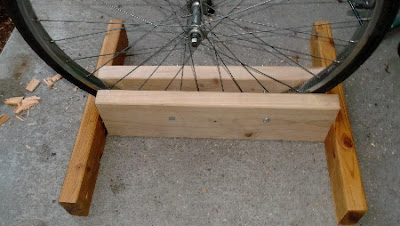
4. Drill a guide hole at each end of the end pieces and screw in the screw eyes as anchor points. I'm thinking rope or strong twine will probably be better than bungees for attaching the clamp to the trailer, but will have a better idea once I can make a proper trial.

20190901

Quick addition

Found out that what I have is a cottered crank and basically you get it apart by whacking it. So I guess I need to whack it harder. But not so hard I damage it, so this is going to be interesting...

Next roadblock...

I finally got the rear fender as cleaned up as it's going to get. It polished up fairly well on the outside, especially once I got the reflector off, but I could only do so much with the heavily rusted inside. I decided not to worry about its little dings -- mostly not noticeable unless you're looking closely -- but did some hand-straightening of the supports and they look much better. I got the reflector off with an adjustable wrench; I think the bolt's not metric, although possibly I just wasn't getting the right angle with a regular one. It had quite a bit of guck trapped under it, so I got rid of that and hit the fender with some more polish. Washing the reflector itself got some water in under the cover, but that popped out and I took the rust remover to the cavity underneath. After some fiddling, I realized the bit of white paper under the cover was the real reflective bit, so since it had gotten wet on top of its rust stains I replaced it with a disk of reflective tape.


Then I had another look at the rear wheel and its fancy hub. Apparently I need a drift punch to remove a ring before I can get into the gear itself, so I'll have to take that down to WNR and use my volunteer privileges to borrow one. Maybe I should make myself a big canvas bag for carrying wheels around.


On the wheel subject: I got the front wheel cleaned up and put back together. Turns out the cotton twill rim tape isn't that odd, just higher-quality than today's normal. When I got to Deschutes and asked for rim tape, they asked if it was for a single-walled or double-walled rim. For double-walled rims you need better tape, for single you can get away with what's basically a big rubber band. I told them it's an older steel rim and guessed it might be double-walled since there are holes in the inside. They told me steel rims are always single-walled and I'd be fine with rubber.

A later web search offered a number of other suggestions, including several layers of electrical tape or strapping tape, but I suspect these would turn out to be more expensive than the rubber (mine was just over $3) as well as needing to be repaired/replaced more often.


Foiled in that direction, I stared on removing the cranks to see if I can clean and service the bottom bracket. There's a weird sideways bolt thing happening there; I got the nut off but can't see how the bolt comes off (if it even does). The head is round so apparently it doesn't unscrew, but tapping it with a rubber mallet didn't (appear to) loosen it. So guess I'll have to consult David-the-Bike-Guru at the end of my next volunteer shift, unless I discover something useful before then.